Showing posts with label graphic design. Show all posts

Tuesday, June 3

After picking up a book that includes pretty pen drawings, like Nina LaCour's Hold Still  (see image below) or Kristen Hubbard's Wanderlove, the thought may occur to you indie authors: I could do that.

photo by amberinblunderland.blogspot.com
You could. But there are a few things you ought to know about the technical side, especially for producing a print version of your book.

I've worked directly with printers on everything from full-color magazines to posters and brochures (as a managing editor and a graphic designer). One important lesson I learned is that every set of equipment has its own vagaries in terms of how it lays ink on the page and how it handles paper. It's almost impossible to have quality control over images when you can't work directly with vendors. But you can get better results if you make design decisions that take certain issues into account.

Below are a few key concepts you need to know about one-color printing (black ink on pale paper) so you (or any designer you hire) can create designs that consistently reproduce well in a print-on-demand environment.

dot gain

Every printed image is made up of a series of ink droplets. Some machinery has the tendency to be overwet in feeding ink, so the dots can spread (or the dot pattern can enlarge going from computer to press). That's called "dot gain" by the industry pros. Other machinery can be a little stingy with ink, resulting in "dot loss," or a less intense, somewhat washed out look.
Dot gain illustrated (image: underwaterphotography.com)

When dealing with solid blacks, dot gain is often not noticeable to an untrained eye. And dot loss is something most printers vigilantly check for.

But when it comes to what are called grayscale images--like black and white photographs, pencil drawings, or pen-and-ink illustration that has shading created with pointillism or fine cross-hatching--dot gain or loss can seriously mar the final printed product.

Bold line art will hold up better across a variety of machines than grayscale images. Thick lines and less detail should yield the very best results.

If you're working with clip art, you want an EPS file or what's called a "vector graphic," rather than a TIFF (tagged image file format), because it won't pixelate if you enlarge it.

Any hand drawing should be done on the smoothest, whitest paper you can buy. When scanning the image, follow these helpful tips.

bleed tolerance

A "bleed" in printing is an image that extends off the edge of the page. CreateSpace allows you to have interior images that bleed and gives very specific instructions for doing that, which I quote below:

Does your book contain images?

If you want your images to bleed to the edges of your book, ensure that they extend at least .125" beyond the final trim size from the top, bottom and outer edges and submit your PDF .25" higher and .125" wider than your selected trim size to accommodate the full bleed area.
Keep in mind all live elements must be at least .25" away from the trim lines, so if your file is formatted to be full bleed all live elements should be .375" away from the edge of the page.   
© CreateSpace, 2014
But here's the rub: not every copy of your book will necessarily print on the same press; print on demand means it typically prints closest to where it will ship. Some presses have a marginally different "tolerance" (an "allowed quantitative difference" aka wiggle room, slip, what have you; see an example here). CreateSpace tries to account for this by having relatively large bleed areas and trim tolerances (.25 compared to .125 of most printers). That way you'll never end up with an image that floats with white space around it when it's supposed to hang off the edge of the page. But you could end up having an image trimmed more severely than you anticipated.

Bleed tolerance example  (image by 48HourPrint.com)

All that to say, be mindful that any image that bleeds could cut off just a bit differently than it looks like it will in your page layout software. Make sure detailed bits, like lettering, are well inside the safety area.

What do you think of adding illustrations to books? Too scary or worth the effort?
Tuesday, June 03, 2014 Laurel Garver
After picking up a book that includes pretty pen drawings, like Nina LaCour's Hold Still  (see image below) or Kristen Hubbard's Wanderlove, the thought may occur to you indie authors: I could do that.

photo by amberinblunderland.blogspot.com
You could. But there are a few things you ought to know about the technical side, especially for producing a print version of your book.

I've worked directly with printers on everything from full-color magazines to posters and brochures (as a managing editor and a graphic designer). One important lesson I learned is that every set of equipment has its own vagaries in terms of how it lays ink on the page and how it handles paper. It's almost impossible to have quality control over images when you can't work directly with vendors. But you can get better results if you make design decisions that take certain issues into account.

Below are a few key concepts you need to know about one-color printing (black ink on pale paper) so you (or any designer you hire) can create designs that consistently reproduce well in a print-on-demand environment.

dot gain

Every printed image is made up of a series of ink droplets. Some machinery has the tendency to be overwet in feeding ink, so the dots can spread (or the dot pattern can enlarge going from computer to press). That's called "dot gain" by the industry pros. Other machinery can be a little stingy with ink, resulting in "dot loss," or a less intense, somewhat washed out look.
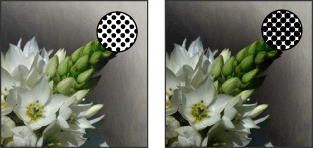
Dot gain illustrated (image: underwaterphotography.com)

When dealing with solid blacks, dot gain is often not noticeable to an untrained eye. And dot loss is something most printers vigilantly check for.

But when it comes to what are called grayscale images--like black and white photographs, pencil drawings, or pen-and-ink illustration that has shading created with pointillism or fine cross-hatching--dot gain or loss can seriously mar the final printed product.

Bold line art will hold up better across a variety of machines than grayscale images. Thick lines and less detail should yield the very best results.

If you're working with clip art, you want an EPS file or what's called a "vector graphic," rather than a TIFF (tagged image file format), because it won't pixelate if you enlarge it.

Any hand drawing should be done on the smoothest, whitest paper you can buy. When scanning the image, follow these helpful tips.

bleed tolerance

A "bleed" in printing is an image that extends off the edge of the page. CreateSpace allows you to have interior images that bleed and gives very specific instructions for doing that, which I quote below:

Does your book contain images?

If you want your images to bleed to the edges of your book, ensure that they extend at least .125" beyond the final trim size from the top, bottom and outer edges and submit your PDF .25" higher and .125" wider than your selected trim size to accommodate the full bleed area.
Keep in mind all live elements must be at least .25" away from the trim lines, so if your file is formatted to be full bleed all live elements should be .375" away from the edge of the page.   
© CreateSpace, 2014
But here's the rub: not every copy of your book will necessarily print on the same press; print on demand means it typically prints closest to where it will ship. Some presses have a marginally different "tolerance" (an "allowed quantitative difference" aka wiggle room, slip, what have you; see an example here). CreateSpace tries to account for this by having relatively large bleed areas and trim tolerances (.25 compared to .125 of most printers). That way you'll never end up with an image that floats with white space around it when it's supposed to hang off the edge of the page. But you could end up having an image trimmed more severely than you anticipated.

Bleed tolerance example  (image by 48HourPrint.com)

All that to say, be mindful that any image that bleeds could cut off just a bit differently than it looks like it will in your page layout software. Make sure detailed bits, like lettering, are well inside the safety area.

What do you think of adding illustrations to books? Too scary or worth the effort?

Wednesday, October 16

photo by jdurham, morguefile.com
My long-time readers might be a little disoriented, since the scenery has changed quite a bit around here. Laurel's Leaves now has a different color scheme, simplified post layout with click-through, and of course a cool slideshow. There are new tabs up top, separating my books from shorter magazine pieces, and offering other goodies like samples for blog readers. I expect to be adding other tabs in the next few months. The followers widget and search tools by date or tag have moved to the bottom, giving a cleaner look.

In addition to radically changing the blog design, I've also redesigned the cover for my debut novel. All this design tinkering is part of developing my author brand.

Brand is more than packaging. It's finding ways to marry content with form and presentation in a way that's winsome and emotionally meaningful.

Many of us, as we begin to move from single title to a body of work, have to stop and reassess our core strengths and messages. What do I want readers to think and feel about what I provide in terms of a reading experience? How do I build an overall aesthetic that communicates that?

Interestingly, one doesn't need to reinvent the wheel when it comes to these sorts of design decisions. Rather, learn from other authors whose look would be equally fitting for your work. After scouring the virtual shelves, I found a very different aesthetic had grabbed me by the throat, one based on some genre cousins in YA literary fiction.

I'll be back Friday for relaunch festivities. Meanwhile, have a look around!

What do you think of the new look? Have you developed a brand? How did you do so?
Wednesday, October 16, 2013 Laurel Garver
photo by jdurham, morguefile.com
My long-time readers might be a little disoriented, since the scenery has changed quite a bit around here. Laurel's Leaves now has a different color scheme, simplified post layout with click-through, and of course a cool slideshow. There are new tabs up top, separating my books from shorter magazine pieces, and offering other goodies like samples for blog readers. I expect to be adding other tabs in the next few months. The followers widget and search tools by date or tag have moved to the bottom, giving a cleaner look.

In addition to radically changing the blog design, I've also redesigned the cover for my debut novel. All this design tinkering is part of developing my author brand.

Brand is more than packaging. It's finding ways to marry content with form and presentation in a way that's winsome and emotionally meaningful.

Many of us, as we begin to move from single title to a body of work, have to stop and reassess our core strengths and messages. What do I want readers to think and feel about what I provide in terms of a reading experience? How do I build an overall aesthetic that communicates that?

Interestingly, one doesn't need to reinvent the wheel when it comes to these sorts of design decisions. Rather, learn from other authors whose look would be equally fitting for your work. After scouring the virtual shelves, I found a very different aesthetic had grabbed me by the throat, one based on some genre cousins in YA literary fiction.

I'll be back Friday for relaunch festivities. Meanwhile, have a look around!

What do you think of the new look? Have you developed a brand? How did you do so?

Thursday, October 10

This site is under construction

Beware of falling debris
(and dead links)


A beautifully refurbished blog 
coming soon!

image: North Safety Products (www.northsafety.com)

Thursday, October 10, 2013 Laurel Garver

This site is under construction

Beware of falling debris
(and dead links)


A beautifully refurbished blog 
coming soon!

image: North Safety Products (www.northsafety.com)

Monday, March 4

Once you take the Indie plunge, you might be tempted to be very hands-off with the vendors to whom you outsource tasks. Especially your cover designer. Writing is verbal, design is visual. Unless you've had the good fortune to have studied communications or journalism, where you're trained in both sets of skills, you likely will take anything your designer says as gospel.

But here's the rub. Some designers know digital deeply and intimately, but have very little knowledge of the ins and outs of print production. And print is a very different animal. What you see on screen is not necessarily what you get in final output when a press (even a digital press) is generating the product.

The one thing you must know and discuss with a designer is this: digital colors and print colors are created completely differently, so how do I get a consistently good product for both e-books and paperbacks?

Digital colors are built from lights in red, green and blue (designers call it RGB). The maximum amount of all three combined creates...WHITE! Weird, right? This is how computers create color. If you only do e-books, you're golden. What you see on screen is an excellent representation of the final product.

RGB or digital color. Image source: wikipedia

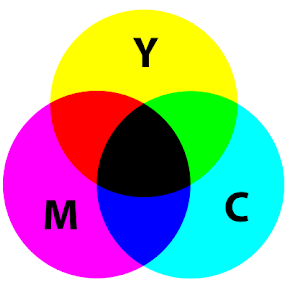
Print colors, on the other hand, are build from inks in cyan (a medium turquoise), magenta, yellow and black (designers call it CMYK). The maximum amount of all four combined colors is...BLACK, like the bottom of the Mariana trench in density of darkness. Because the RGB system of a computer monitor makes color differently than a printing device, what you see on screen is not exactly what you get when output onto paper. There's translation involved. And if you want your paperback cover to look as attractive as you e-book, you need to be careful about color choice.

CMYK or "process" color used in printing


Is you mind blown?

Can you see why you might want to discuss color with your designer? Or, if you're a do-it-yourself-er, why you need to educate yourself a bit?

When choosing solid colors for a design, you need to see swatches from a "process color" swatch book to really know what your output will look like. A nice onscreen color might become a muddy or hazy color when translated to CMYK. This is especially true for darker shades of blue from royal to navy.

Another tip--especially for colored text--you want those colors to be composed of the fewest number of inks. Remember that the print process involves laying down tiny dots of ink next to each other. Newer digital presses are pretty good at staying aligned, but there's always a chance that off-register problems can arise. Here's an illustration that shows the ugly result of misalignment in registration.

cyan and magenta are misaligned; image from Wikipedia
The fewer inks you use, the less likely you'll have to worry about misalignment. So when looking through that process swatch book, think about what color will output best that can be made most simply.

For example, when selecting between two emerald greens, such as these two:
PMS 348: C=97, Y=95, M=17

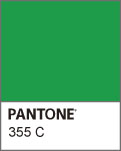
PMS 355: C=93, Y=96

I know I'll get better results with the two-ink shade than the three-ink shade.

If you're planning to only create e-books, someone with expertise in Web design might be perfectly capable of creating a great cover design. If you plan to do both e-book and a paperback, however, it's a good idea to work with a designer with some print experience. And the more you know, the better you'll be able to communicate and make wise decisions.

And do-it-yourself-ers, take the time to learn about the print process. A few resources I recommend are:

Printing and Prepress Basics
Claudia McCue's book Real World Print Production with Adobe Creative Suite Applications
From Design Into Print: Preparing Graphics and Text for Professional Printing by Sandee Cohen
The Non-Designers Design Book by Robin Williams

Do you feel more empowered as a consumer of design services? What other questions or concerns do you have about producing print books?
Monday, March 04, 2013 Laurel Garver
Once you take the Indie plunge, you might be tempted to be very hands-off with the vendors to whom you outsource tasks. Especially your cover designer. Writing is verbal, design is visual. Unless you've had the good fortune to have studied communications or journalism, where you're trained in both sets of skills, you likely will take anything your designer says as gospel.

But here's the rub. Some designers know digital deeply and intimately, but have very little knowledge of the ins and outs of print production. And print is a very different animal. What you see on screen is not necessarily what you get in final output when a press (even a digital press) is generating the product.

The one thing you must know and discuss with a designer is this: digital colors and print colors are created completely differently, so how do I get a consistently good product for both e-books and paperbacks?

Digital colors are built from lights in red, green and blue (designers call it RGB). The maximum amount of all three combined creates...WHITE! Weird, right? This is how computers create color. If you only do e-books, you're golden. What you see on screen is an excellent representation of the final product.

RGB or digital color. Image source: wikipedia

Print colors, on the other hand, are build from inks in cyan (a medium turquoise), magenta, yellow and black (designers call it CMYK). The maximum amount of all four combined colors is...BLACK, like the bottom of the Mariana trench in density of darkness. Because the RGB system of a computer monitor makes color differently than a printing device, what you see on screen is not exactly what you get when output onto paper. There's translation involved. And if you want your paperback cover to look as attractive as you e-book, you need to be careful about color choice.

CMYK or "process" color used in printing


Is you mind blown?

Can you see why you might want to discuss color with your designer? Or, if you're a do-it-yourself-er, why you need to educate yourself a bit?

When choosing solid colors for a design, you need to see swatches from a "process color" swatch book to really know what your output will look like. A nice onscreen color might become a muddy or hazy color when translated to CMYK. This is especially true for darker shades of blue from royal to navy.

Another tip--especially for colored text--you want those colors to be composed of the fewest number of inks. Remember that the print process involves laying down tiny dots of ink next to each other. Newer digital presses are pretty good at staying aligned, but there's always a chance that off-register problems can arise. Here's an illustration that shows the ugly result of misalignment in registration.

cyan and magenta are misaligned; image from Wikipedia
The fewer inks you use, the less likely you'll have to worry about misalignment. So when looking through that process swatch book, think about what color will output best that can be made most simply.

For example, when selecting between two emerald greens, such as these two:
PMS 348: C=97, Y=95, M=17

PMS 355: C=93, Y=96

I know I'll get better results with the two-ink shade than the three-ink shade.

If you're planning to only create e-books, someone with expertise in Web design might be perfectly capable of creating a great cover design. If you plan to do both e-book and a paperback, however, it's a good idea to work with a designer with some print experience. And the more you know, the better you'll be able to communicate and make wise decisions.

And do-it-yourself-ers, take the time to learn about the print process. A few resources I recommend are:

Printing and Prepress Basics
Claudia McCue's book Real World Print Production with Adobe Creative Suite Applications
From Design Into Print: Preparing Graphics and Text for Professional Printing by Sandee Cohen
The Non-Designers Design Book by Robin Williams

Do you feel more empowered as a consumer of design services? What other questions or concerns do you have about producing print books?